This post is a bit late since it was originally intended to go up on Labor Day. Well, it didn't. An excruciatingly busy work schedule got in the way. Anyway, here's the post:
Labor Day Weekend!!....time to relax and take it easy. Maybe get a bunch of work done on the car.....Nope - not if you own a house, and have a young'n running around. Out of 72 hours, I literally got 3 hours to work on the car. The rest was spent maintaining said house and tending to the young'n.
You'll notice, I said car...as in singular After sitting for a week and a half, the remains of Blue went away on a rainy Monday morning. So now I'm down to just the white car. After a little more tear-down and preparation, I'll be ready to actually start building a race car.
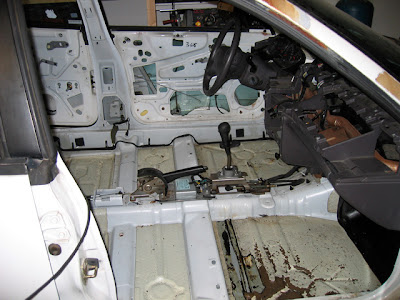
I've decided that the first thing on the list should be the interior. My plan is to completely strip it, clean it, and paint it a nice gray color - both to keep it cool(er) inside, and cut down on any reflection/glare. Plus, it gives it that 'professional race car' look. I figure, if I can't actually
be fast, the car should at least
look the business. It's bad enough that I'll likely be bumbling around in last place - I should at least enjoy my surroundings, right?
My goal is to get the paint work done by the time the snow flies so I don't have to suffer through paint fumes in the closed-up garage.
First order of business is to remove the factory-installed soundproofing - more commonly known as Tar Mats. These are literally large sheets of tar that Chrysler laid down on the floors to cut down on road noise. By the time I took these pictures, I had already started stripping the passenger side - but you get the idea.
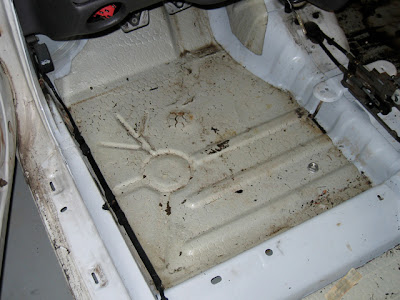

Here's my personal favorite - can't wait to get to this one. Clearly, the trunk had a leak on this car, since there was about an inch of standing water in the spare tire well when I got it. Which, coincidentally, I think is to blame for a particularly vicious, recent mosquito outbreak in my garage.

Now - I'm under no illusions here. The weight savings gained by removing these mats is maybe 10 lbs. I'm only doing it because I have an entire winter to work on the car before it's debut next year. Well, that and the aforementioned "pro race car look". I can't think of anything cooler, and more purposeful than a properly prepped race car cockpit.
The amount of manual labor involved in removing these things is stupefying. I had really high hopes for one method of removing them that involved smashing up blocks of dry ice and letting it sit on the mats until they pretty much cracked from the extreme cold (-109F). This method had a lot going for it because if done right, the tar mats come off in huge chunks AND, you get the added benefit of having the inside of your car look like the set of a cheesy horror movie for several hours. Failing this, I'm left to remove them with a heat gun, a scraper, and a lot of messy work.
Despite the hope and encouragement offered by
this link it was not to be. Apparently, Chrysler had special "ultra stubborn" tar manufactured for the Neons. Very much unlike the huge chunks that came off in the Honda example above, all I got was small chips zinging all over the car every time I hit the mats with a hammer and chisel. While this was plenty amusing, it was hardly progress. More importantly, the hammer and chisel were leaving behind a fairly thick layer of tar that would still have to be addressed - most likely with the previously mentioned heat gun and scraper. It didn't make a lot of sense to pay for dry ice ($9.00/10lb block) only to have to finish the job with the heat gun anyway. In the pic below, the larger black area in the center is the result of 5 lbs of dry ice smashed up and left to sit for 30 minutes, then followed by about 10 deafening minutes smacking it with a hammer and chisel. By contrast, the smaller, cleaner area right next to it is the result of 5 minutes with a heat gun and a putty knife.
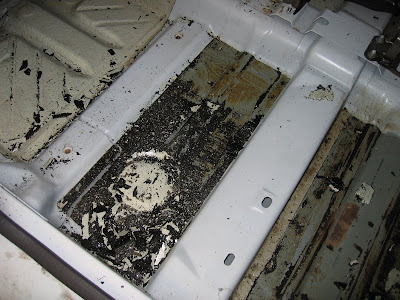
So, $4.00 in dry ice, 30 minutes of waiting, and 10 minutes of hammering - only to still need the heat gun, versus $0.00, and 5 minutes with the heat gun - no extra cleanup needed. Looks like the heat gun is going to be busy.


